How to Master the Sand Molding Process for Perfect Castings?
The sand molding process is a crucial technique in the casting industry. It determines the quality of the final product. Mastering this process can lead to perfect castings, enhancing efficiency and reducing waste.
In the sand molding process, materials like sand and clay come together to form molds. This mixture requires precise ratios. Even a small mistake can result in defects. For instance, too much moisture can weaken the mold, leading to failed castings. Observing these details is vital.
As we explore the intricacies of the sand molding process, it becomes clear that practice and patience are key. The journey may involve repeated trials. Each attempt offers lessons on improvement. Reflecting on past mistakes can lead to better results. Mastering this art takes time, but the rewards are worth the effort.
Understanding the Basics of Sand Molding in Metal Casting
Sand molding is a foundational technique in metal casting. This process involves creating a mold from sand, which is both cost-effective and versatile. Approximately 70% of the world's metal castings are produced using sand molds. This high percentage demonstrates its importance in the industry.
To master sand molding, one must understand its basic components. The sand must have a suitable grain size and uniformity. A mix of clay and water is also essential for binding. However, achieving the perfect consistency can be challenging. If the sand lacks moisture, it can produce weak molds. Conversely, too much moisture can lead to defects.
Quality control is crucial in this process. The permeability of the mold affects how gases escape during pouring. According to industry data, about 10-15% of casting defects stem from mold issues. These defects could range from surface imperfections to structural weaknesses. It's essential to regularly analyze the sand mixture and adjust it as needed. This approach helps in minimizing inconsistencies and ensuring the production of high-quality castings.
Materials Required for Effective Sand Molding Techniques
To achieve perfect castings, understanding the materials needed for sand molding is essential. Effective sand molding primarily requires high-quality sand, a suitable binder, and water. The sand should be clean and granular, allowing for good compaction. Common types include silica sand and green sand, each with its unique properties. The binder, usually clay or resin, helps the sand hold its shape. Water is crucial, as it activates the binder, creating a cohesive mixture.
Tips: Consider testing different sand types. A small change can affect the final product. Improper binder ratios could cause weak molds. Adjust the water content for better consistency. Sometimes, it’s useful to experiment with additives to enhance molding materials.
Another critical aspect to remember is the environment. Humidity can alter sand properties. If the air is too dry, molds may crack. If too wet, they might not hold shape. Monitoring these factors ensures more reliable outcomes. Engaging with the process is vital. Reflect on each casting; learn from the flaws. Mistakes often lead to the best improvements.
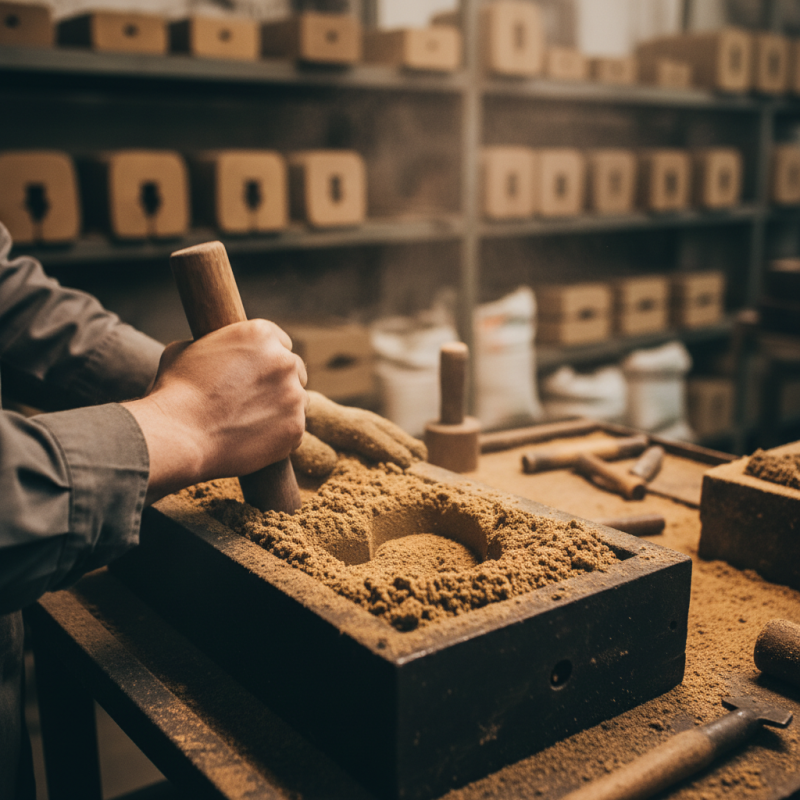
Step-by-Step Guide to Preparing Sand for Molding
Mastering the sand molding process requires meticulous preparation. Begin with selecting the right type of sand. Use silica sand for its strength and stability. Remember, finer sand can result in smooth surfaces but may lead to poor mold strength. Mixing in clays can enhance mold cohesion, but avoid excess clay, as it may make the mixture too sticky.
Next, focus on moisture content. Aim for a balance; too much moisture can cause misalignment in forms, while too little results in cracks. The ideal mixture should feel damp but not overly wet. Spend time testing your sand mix using small molds; this helps identify issues before you forge larger pieces. Each iteration offers lessons, so keep detailed notes on what works and what doesn't.
It's essential to evaluate your molds after each casting. Look for imperfections such as rough surfaces or miscasting. These flaws often signal adjustments needed in your sand mix or processes. Learning from these mistakes is crucial. Reflect on every casting's outcome; even perfect castings can reveal hidden areas for improvement.
How to Master the Sand Molding Process for Perfect Castings? - Step-by-Step Guide to Preparing Sand for Molding
| Step | Action | Description | Tips |
| 1 | Choose Quality Sand | Select silica sand with appropriate grain size for molding. | Test different sand types to find the right one for your project. |
| 2 | Add Bindings | Incorporate binding agents like clay to improve the sand's cohesiveness. | Use the right amount of binding agent; too much can harm the mold. |
| 3 | Moisten Sand | Add water to achieve proper moisture content for shaping. | Check moisture level regularly to maintain optimal conditions. |
| 4 | Mix Thoroughly | Ensure an even distribution of sand, binder, and moisture. | Use a mixing machine for consistency, if available. |
| 5 | Pack Sand into Molds | Carefully fill the mold with the prepared sand mixture. | Compact the sand firmly to prevent defects in castings. |
| 6 | Create Venting | Add vents to allow gases to escape during the pouring process. | Ensure vents are strategically placed for optimal airflow. |
| 7 | Allow Sand to Set | Let the sand mold cure for a period to ensure strength. | Timing can vary based on humidity and temperature conditions. |
| 8 | Pour Metal | Carefully introduce molten metal into the mold. | Monitor pouring temperature for optimal results. |
| 9 | Remove Casting | Once cooled, extract the casting from the mold. | Handle with care to preserve the integrity of the casting. |
Best Practices for Shaping and Assembling the Mold
In the sand molding process, each detail matters. A mold's shape defines the final casting's quality. Thoroughly prepare your sand mixture. It should have the right balance of moisture and compaction. Too dry, and the mold will collapse. Too wet, and it won't hold shape. This balancing act is crucial for success.
Shaping the mold requires precision. Use a consistent technique while packing the sand. Gaps can lead to defects. Remember, imperfections in your mold will reflect in the casting. Take the time to inspect your work. Look for inconsistencies, and adjust as necessary. Adding venting holes can also help with air escape during pouring.
Assembling the mold is where challenges arise. Align the halves perfectly to prevent miscasting. A misalignment can make a project go awry. Take a step back and evaluate your setup. Even seasoned professionals benefit from this. Rushing the assembly can lead to regrets later. Attention to detail can save time and resources down the line.
Troubleshooting Common Issues in the Sand Molding Process
Troubleshooting common issues in the sand molding process is essential for achieving perfect castings. Many foundries face challenges such as sand quality, moisture content, and improper molding techniques. According to a recent industry report, approximately 30% of casting defects arise from poor sand conditions. Fine sand grains can lead to increased surface roughness in castings. On the other hand, overly coarse sand can create weak molds.
Moisture control is another critical aspect. An ideal moisture level for sand is between 2% and 4%. Exceeding this range can cause issues like mold collapse. Many operators find that inconsistent moisture levels can lead to increased scrap rates, sometimes up to 15%. Such figures emphasize the need for meticulous monitoring and adjustment during production.
Improper packing of the sand can also contribute to casting failures. If the sand is not compacted uniformly, it can lead to defects like blowholes or misalignment in the final product. Operators should strive for uniform compaction. Regular training and adherence to best practices are vital. Attention to these details can greatly reduce defects and improve overall productivity.